

So far we’ve covered two ways to develop your ear for Chords and Progressions:
- Our Basic Drill: playing through a series of examples of different kinds, paying attention to the sounds and what’s distinctive about each. Either labeling them out loud as we go, or using recorded examples and trying to “guess the answer” each time. This can usefully be done with your instrument, trading examples with a friend, using pre-recorded audio tracks, or interactive apps.
- Using examples from real music, selected to demonstrate the particular Chords and Progressions we are focused on. Again, either speaking/singing the known “answers”, or using music where we don’t know the progression to test our skills with.
These are great exercises for getting started with, and can continue to be part of how you do Ear Training for Chords and Progressions—but they’re not the only way!
Like we did with Intervals and Solfa, we want to make sure we are not just doing “Practice Exercises” but also “Apply Activities”, making sure our Head, Hands, Hearing and Heart are working together, forming connections, and enabling real, practical musical abilities. So in the spirit of Integrated Ear Training, let’s look at some other ways you can develop your ear for Chords and Progressions across a range of musical activities.
Singing
At first it might seem wacky to talk about practicing Chords by singing—after all, we can’t sing more than one note at once! Additionally, the average singer typically thinks less about Chords and Progressions than instrumentalists do.
If you’ve read Chapter 4: Singing and understand the idea of “singing as a tool” though, you can probably already see the opportunity here…
We’ve touched on it already, earlier in this chapter: if we want to be able to dissect a chord into its constituent notes, for example to identify the Chord Type or to follow the root note movement in a progression, Singing can be a huge help. As your skills develop you will likely move to audiation or simply hearing what you need to directly, but even musicians with advanced ear skills for harmony can still make good use of singing on occasion.
So the first use of Singing for Chords and Progressions could be described as to “explore” and “check your answers”. It’s a way for you to grab hold of a note you’ve heard and give your ears more of a chance to analyse what’s going on. That could be singing up the notes of a chord, transforming it into an arpeggio, and giving your Solfa or Intervals skills a chance to help you identify the Chord Type. It could be singing the root notes of the chords in a progression, likewise letting you leverage Solfa or Intervals to identify the progression.
We’ll discuss this more in Chapter 14: Playing By Ear when we introduce the Listen-Engage-Express approach of the Play-By-Ear Process.
There is a second valuable use of Singing for Chords and Progressions, which is to actually use your singing voice as your instrument for our Basic Drill. We already mentioned that if you play an instrument which only produces a single note at once (e.g. saxophone rather than ukulele), you can play example chords note-by-note in arpeggio form. This applies to Singing too.
To make that concrete, here are three highly effective Singing exercises, which are each essentially just variants on our Basic Drill, using your singing voice as the instrument:
EXERCISE: Singing Chord TypesThis exercise will help you learn to distinguish different types of chord, starting with our main building blocks of Major and Minor Triads:
|
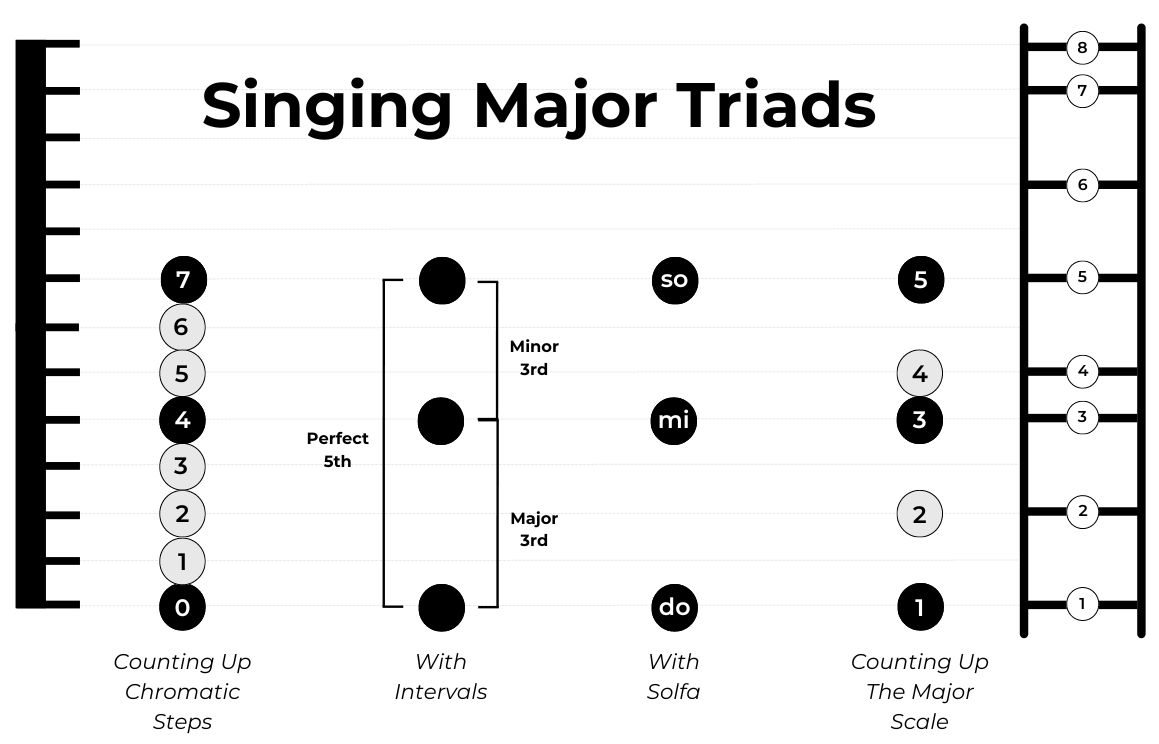
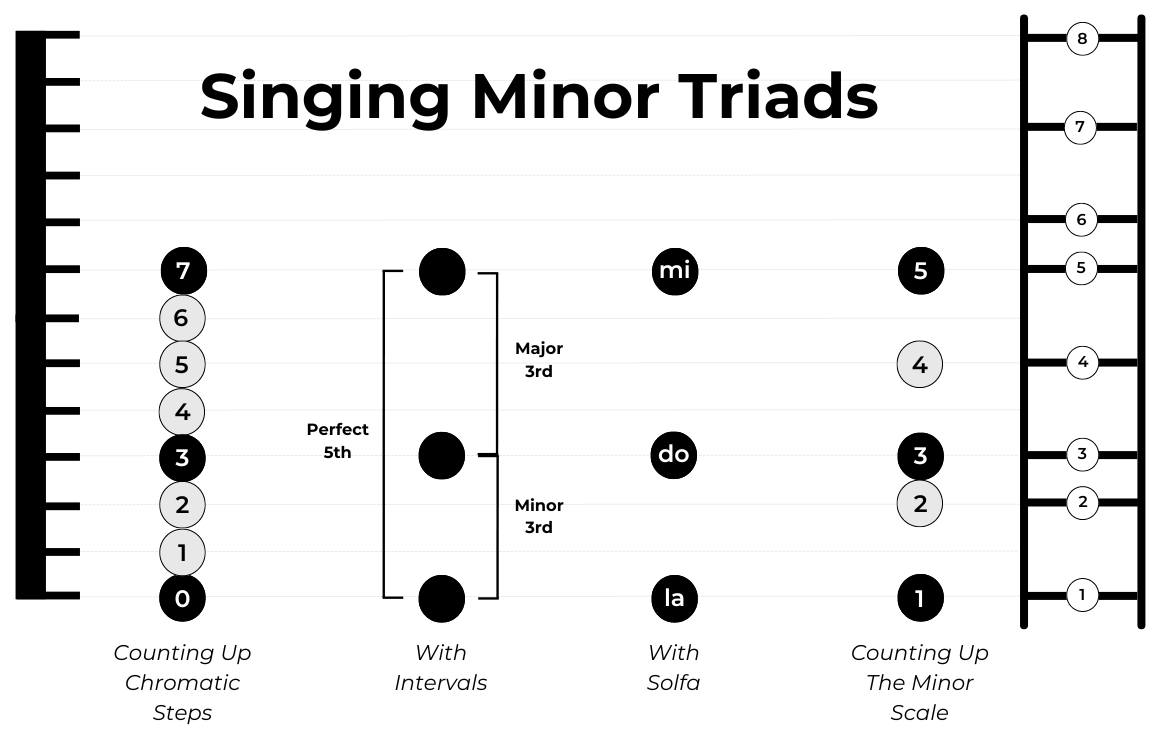
This may seem laborious, especially compared to playing examples on an instrument, but the extra effort involved in finding the notes, and then producing the right pitches directly with your own body without relying on an instrument’s button-pressing interface, is exactly what makes this exercise so powerful.
EXERCISE: Singing Chord DegreesThis exercise will help you learn to recognise Chord Progressions through identifying the scale degree each chord is based on, starting with our main building blocks of the I, IV, and V chords:
|
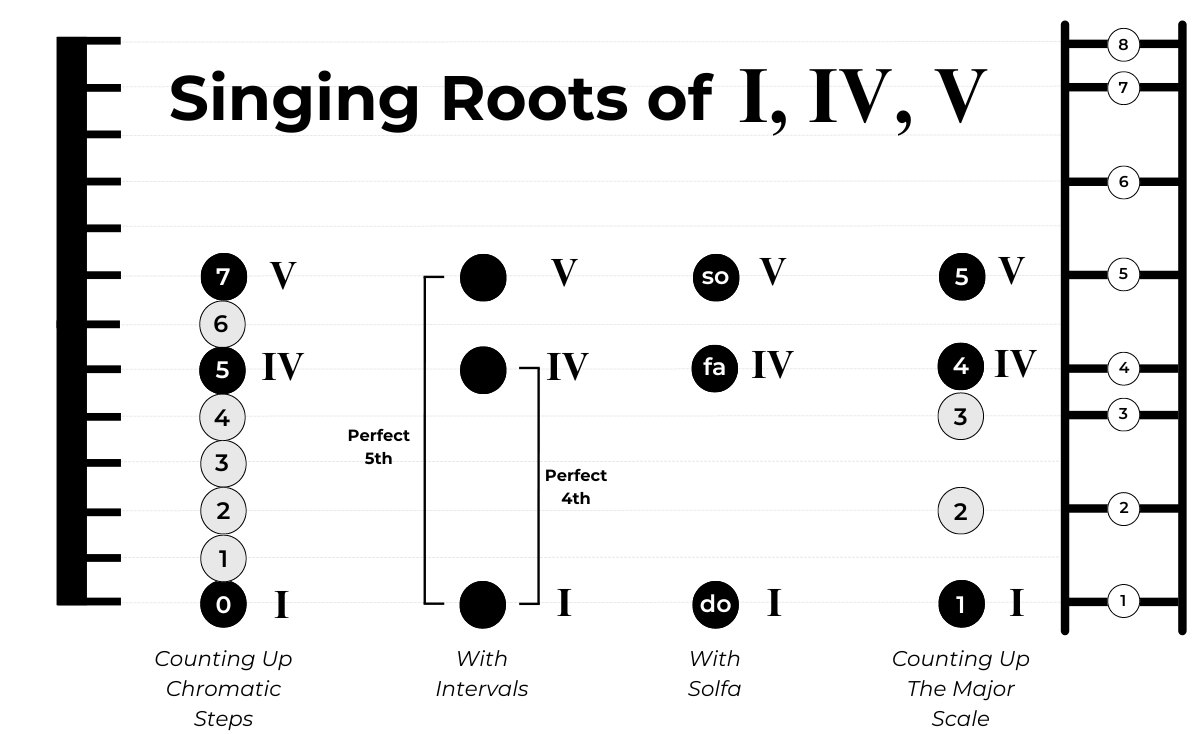
This exercise may seem overly-simplified, since we are working with only the root notes and not the full chords, but it can be very effective for helping you tune in to the movement from one chord degree to another.
EXERCISE: Singing Chords In ProgressionsThis is probably my favourite Singing exercise for practicing Chord Progressions, because you get so much “bang for your buck”. We simply combine the two exercises above, singing through example progressions but singing each chord as an arpeggio so that we hear all its notes. It is especially well-suited to a Solfa approach, as you’re reinforcing your sense of each Solfa degree at the same time as your familiarity with the Progressions.
Example in the key of C Major:
|

| TIP: If you’re working on Solfa then just singing examples like the above a handful of times each day would be my #1 recommendation for how to really get a strong feel for I, IV, V progressions quickly. You leverage your Solfa skills, you get deep inside each chord, you gain an instinctive feeling for how one flows to the next in different combinations, and you continue to level up your Solfa versatility throughout. |
Instrument Practice
We’ve already covered some simple ways to practice Chords and Progressions with various versions of our Basic Drill, where you can use your instrument as a source of examples.
Let’s look at some other instrument-based Ear Training exercises you can try.
EXERCISE: Habitual MutteringOne simple but impactful habit you can adopt is to:
|
Depending on your instrument and style of music, step one may be simple—or not!
For example, if you’re a guitarist playing from chord charts or from staff notation with chord symbols above, simply take a few minutes to go through and write in the corresponding Roman Numerals beside each letter-name chord symbol. This may be slow-going the first few times, as you learn to identify the key from the key signature or using the “Finding the Key By Ear” process from Chapter 8: Relative Pitch, and the information in this chapter to translate from chord names into Roman Numerals, but once you’ve done it a handful of times it should become quite quick and easy for you to figure out for a new song.
If you’re playing a style of music without obvious chord indications (e.g. Classical music) or you play an instrument which doesn’t produce chords, you will first need to either:
- A. Identify the letter-name chord(s) present in each measure, and then translate to Roman Numerals. Or,
- Recognise the Chord Progressions directly in Roman Numeral form (using the skills you’re developing in this chapter)
For the average instrumentalist, approach A may be quite tricky. You may find it easier (and interesting in its own way) to adopt some repertoire in a style where the sheet music does typically provide the chord names. Or you may relish the challenge of analysing the score, or consulting with a musical friend who can help you determine the chords present.
Once you know the chord progressions, step two of the exercise is very straight-forward: speak, sing, or just audiate yourself saying the name of each chord as it arises.
For a guitarist, this might mean muttering (hence the name of this exercise!) each chord label as you play it. For a trumpeter it might mean hearing “one….. four….. one….. five…..” in your head as you play the melody or improvise a solo.
The power in this exercise lies not in doing it once or twice, but making it a daily habit. The more you can become aware of the underlying Chords and Progressions in the music you’re practicing and playing anyway, the more versatile and instinctive your skills will become.
Building off that exercise, once we have the progression of a piece of music in Roman Numeral form, one great activity is to transpose the same progression into another key and try playing it in that key.
EXERCISE: Transposing Progressions
|
As with the previous exercise, for non-chordal instruments this is slightly more challenging, as you’ll need to transpose your melody part. Remember Convergent Learning—and don’t shy away from the challenge!
If your instrumental focus is playing chords, or you’re writing music based on chord progressions, you’ll find this activity of transposing the same progression into a variety of keys really helps you to hear the common musical journey across all keys, and helps you to then spot the same kinds of progression in other music too
It’s worth mentioning that playalong or backing-track apps can be helpful here, as they can typically directly transpose the same set of chords into a new key at the push of a button. That’s handy if you struggle with figuring out the transposition, or if you play a melodic instrument and want a backing part in each new key to play over.
Although you are skipping the legwork of figuring out the transposition, you can still get a lot of benefit by using this convenience in conjunction with the previous exercise (i.e. speak/sing through the same Roman Numeral chord names in each new key you try).
.
EXERCISE: The “Axis Of Awesome”This exercise is named for a viral video from several years ago, by the comedy music act Axis of Awesome. The video featured the trio playing through a whole series of 4-chord songs based on the same progression, demonstrating how the exact same progression was actually present across a huge range of hit songs. So the exercise here is simple:
|
You’ll find example playlists as well as a link to that original video in the Additional Resources.
This isn’t just a fun gimmick like the Axis of Awesome video might suggest. It is a powerful way to really start hearing the underlying changes.
You’ll soon start to notice the same 3-chord and 4-chord progressions jumping out at you in other songs, either because you consciously notice e.g. “oh, it sounds just like Don’t Stop Believing” or just because you have gained a more general, instinctive grasp of these 3- and 4-chord progressions, and can spot them by their characteristic sounds.
| Almut Says… I am doing this with my music group, but we are singing two or more songs at the same time :-) There is a musical form that is called “Quodlibet” (a Latin term which translates to “as you like it”), which is really a fun combination of songs that follow the same chord progression and fit together harmonically. Bach was quite fond of them. It sounds like a round, but with two songs sung in parallel. It always amazes singers if we combine songs and they sound great together—and I continue playing the same chord progressions as accompaniment on the guitar! |
Applied Activities
As early as possible, you’ll want to start applying your new skills with Chords and Progressions to real, practical musical activities. The Integrated Ear Training approach means developing all four H’s (Head, Hands, Hearing, Heart) in each and every practice session. So not just “Learning” (Head) and “Practicing” (Hearing, perhaps Hands) but “Applying” (Head, Hands, Hearing, Heart).
Several of our exercises so far have been quite practical, particularly relating to Playing By Ear. Let’s explore how we can further develop our skills with Chords and Progressions through applied musical activities.
Playing By Ear
As you’ll learn in Chapter 14: Playing By Ear, playing music by ear starts as “figuring it out by ear”. This means you can immediately start practicing Playing By Ear, even when just starting out developing your ear for Chords and Progressions.
The process is simple:
EXERCISE: Playing Progressions By Ear
|
It will probably take a few listens to get your transcription (yes, you just transcribed the chord progression!) complete and correct. The most important thing is to really pay attention with your ears. If you just guess blindly and rely on your ears to tell you “does this match or not?”, that will be of some value—but the real power of this exercise comes when you try to identify each chord before playing anything. Over time your “guesses” will get more and more accurate, until “figuring it out by ear” can become directly “playing it by ear”.
If you would like to “check your answers” you can look up the chord chart for the song online. Just search for the name of the song and “chords”, and you will typically be able to find a page with the lyrics of the song and the chord symbols written above showing when each change occurs relative to the lyrics. Do keep in mind that these “answers” aren’t always perfect, and may include a more detailed or sophisticated interpretation of the harmony. Your own “answer” may be just as valid! Trust your ears and personal taste, and that “if it sounds good, it is good.”
Note that at first, it may be a challenge to even detect when the chord is changing. This is part of the skill you’re developing, so don’t worry if at first you miss some changes.
If you have difficulty hearing the meter and when each measure begins, don’t worry. The subsequent chapters Chapter 12: The Beat and Chapter 13: Rhythm will help you refine that skill. For now just write things down as best you can, focusing on the changes from one chord to the next.
Once you gain some proficiency working with I, IV, V tracks like this you can continue by:
- A. Creating a playlist of 3-chord songs and challenging yourself to tune in and play along as quickly as possible as each song comes up, or
- Extending to 4-chord songs, and then any songs you choose. You may need to leave some placeholders (just write a question-mark) for unfamiliar chords. Even just listening through and spotting when the tonic chord is appearing can be a valuable exercise!
These simple activities are a great way to bring your burgeoning Chords and Progressions skills into the world of real music, as well as connecting them with your instrument. We’ll go into more depth on this in Chapter 14: Playing By Ear.
Transcribing
We have already introduced one transcription activity above, as part of capturing the “answer” of figuring a song out by ear. But can you take it a step further, and not use an instrument at all?
Try using the same steps as above, but instead of relying on an instrument to produce notes or chords to compare with what you’re hearing in the track, use only your ears. Can you recognise each chord in a I, IV, V progression in the real music track?
You might like to use Singing or Audiation to help you. For example, singing the root notes of I, IV, and V to compare, or audiating the tonic to keep a clear sense of the tonal centre as you hear each chord and how it relates.
Once you think you have it, write it down in Roman Numerals. Then identify the key, translate into letter name chords, and check your answer, either by playing through on an instrument and comparing, or by looking up the chords as explained above.
Harmonising By Ear
Did you know that all seven notes of the Major Scale occur in the I, IV, and V chords? This is perhaps one reason why 3-chord songs are so prevalent: take any melody using just the notes of the Major Scale, and whatever the current note is, the I, the IV or the V chord features that note.
Naturally we tend not to change chords with every note of a melody! But the principle holds, that you can harmonise (meaning “add harmony to”) any major melody comfortably using only the I, IV, and V chords.
This allows for a simple but very empowering exercise. As soon as you have some handle on the I, IV, and V, take a simple melody, and decide for yourself which chords go best with it.
You might like to use the simple melodies provided in Chapter 9: Solfa. Sing the melody, and use its scale degrees to suggest to you which chord might fit. For example, if the first line of the melody features only the notes do and mi, the I chord with its do, mi and so notes will fit nicely. If the next line moves on to mi, fa and la then the IV chord with its fa, la and do might work well—or you may well choose to stay on the I and let the fa and la create some tension!
Try different possibilities, and notice the musical results. It’s enlightening to hear the impact of choosing between various “valid” choices, including how often you choose to change the chord.
We’ve illustrated it in Solfa terms above, but if you’re not yet using Solfa, just think in terms of scale degrees and the notes which belong to each chord.
Aside from it being exciting to realise you can harmonise a melody yourself (something many would consider a very advanced skill) this is a really effective way to bridge between melody and harmony skills, and connect the dots between Solfa and Progressions. With practice, you’ll be able to instinctively hear which chords would go well with a melody, and when the melody would benefit from the chord changing versus staying the same.
Naturally this is a huge benefit for songwriters and composers, but also valuable if you’d like to improvise full arrangements on keyboard, or accompany yourself singing on guitar, for example. And of course, once you’re comfortable with the I, IV, and V Chords, the same principle that “things sound natural when the notes of the chords feature some or all of the notes of the melody” can be extended to the vi chord and any other chords you’re working with.
By Ear—Or By Theory
Another possibility is to harmonise a melody purely based on the theory. If you have the melody written down in staff notation or Solfa, you can come up with your own accompanying progression just by thinking about the notes present and what might fit well. You can write down a harmonisation, and then play it.
Although you’re missing out on the experimentation-by-ear when you do it this way, it can still be a good exercise to try in addition to the ear-based one above, particularly if you are still getting comfortable with the connections between scale degrees and the I, IV, and V Chords.
Improvising
We’ve already begun exploring improvised progressions in some of the exercises earlier in this chapter, by simply choosing a key, selecting certain chords (e.g. the I, IV, and V) and then spending some time playing through different sequences featuring those chords.
You can take this a step further in a number of ways, such as:
- Thinking about Form. Pick one chord sequence to represent your “A section” or “verse”, and then come up with a different sequence to be your “B section” or “chorus”, and notice how much richer your improvisation immediately becomes, just by having those two different “journeys” as part of the musical whole.
- Improvising melody over your chosen progressions. This is well-suited to keyboard instruments where you can play a progression with the left hand and a melody over the top with the right. You can also play the progression on a chordal instrument and improvise the melody with your singing voice. Experiment with letting the harmony inform the melody (e.g. by choosing notes for the melody based on the notes of the current chord) and vice-versa (e.g. using the “harmonising by ear” principle above). You could also adapt the “Melody-Inspired Improv” exercise from Chapter 15: Improvisation, using the same words, rhythm and chords as an existing song you know, but choosing new melody notes to sing the words to, trusting your ear to find notes which fit the harmony.
- Exploring different arrangements. How many different ways can you play through the same I, IV, V progression, for example? Changing the voicings, using suspended chords, using seventh chords, moving the same progression into another key, etc. If you play a non-chordal instrument how can you switch up the way you play the notes of each chord? For example, playing the notes in different orders, moving one or more notes into a higher or lower octave, mixing up the rhythmic patterns you’re playing (not just one note per beat, but all different rhythmic combinations), etc.
Not only is this a fun, creative way to practice with Progressions, it’s a great gateway to thinking in a more structured way about your improvised music. If improvisation in the past has felt like “play a random series of notes until it’s time to stop”, you’ll be amazed at the instant effect that thinking in terms of Progressions will have.
More on this in Chapter 15: Improvisation.
Songwriting
If you have read through this chapter with Songwriting in mind, hopefully you can already see how Ear Training for Chords and Progressions will develop your instinctive sense of “what chords will work well”, and create the connections between harmony, melody, and even lyrics. Whether you’re a songwriter who wants to put chords to your lyrics and melody, or you want to sit down with staff paper and write an interesting arrangement that works well harmonically, you’ll be empowered to make your own creative choices.
All of the other activities above (Playing By Ear, transcribing, harmonising and Improvisation) will also feed into your ability to compose your own harmony, giving you the ear skills (Hearing) and intellectual understanding (Head) that allow your Heart to express everything you wish to, and building the connection to your instrument (Hands) to be able to freely experiment and express your musical ideas through Chords and Progressions.
We’ll discuss this in more detail in Chapter 16: Songwriting.