


So far we have covered the theory of Intervals (Learn) and begun to explore their sounds in an isolated way (Practice). Now let’s continue with exercises you can use to Practice and Apply your interval skills. In the spirit of Integrated Ear Training, you’ll likely also want to refer back to the information above and continue with “Learn” moments as you work to Practice and Apply, developing and connecting your Head, Hands, Hearing and Heart.
With all of the exercises suggested below, start small. Pick just two or three types of interval to include, and one of the three forms. Then add either a different form for the same set of types, switch to a different set of types, or expand the set of types.
For example your sequence might look like this:
- m2 and M2, harmonic
- m2 and M2, ascending
- m2 and M2, descending
- m3 and M3, harmonic
- m3 and M3, ascending
- m3 and M3, descending
- m2, M2, m3, M3, harmonic
- m2, M2, m3, M3, ascending
- m2, M2, m3, M3, descending
- Continue to P4, P5, and various combinations
Or your sequence might look like this:
- m2 and M2, ascending
- m3 and M3, ascending
- P4 and P5, ascending
- U, m2, M2, m3, M3, ascending
- U, m2, M2, m3, M3, P4, P5, ascending
- Then repeat for descending, then harmonic
Naturally, if you find that adding additional types becomes too challenging, you can adjust which ones you include in practicing, to help you pinpoint where you’re getting stuck or confused.
The main thing to know is that mastery of each interval type and form is not necessary. It’s not necessary before moving on with your training, and it’s definitely not necessary to start using intervals in your music-making either.
In fact, allowing yourself to be flexible will typically accelerate your training, by letting you skirt around obstacles and sticking points. When you return to them later you will often find that your improved sense of Relative Pitch has already removed the problem (remember Convergent Learning from Chapter 2: Mindset and the 80% Rule from Chapter 8: Relative Pitch).
So don’t be afraid to move on before 100% perfect mastery of certain interval types. Aim for 80% or “I normally get it right”, then come back later and polish up any problem spots.
Be persistent, because it does take time and repetition to teach the brain new skills. But if you find yourself feeling stuck or getting frustrated, remember that moving on to something else can actually accelerate your overall progress.
Make sure to leverage the foundational skills from Part I of this book (Singing, Audiation, Active Listening and Superlearning) and combine learning Intervals with learning Solfa. You’ll find additional tips in the “Tips and Tricks” in the Additional Resources.
Singing Exercises
As we learned in Chapter 4: Singing, the feedback loop between your ears and your voice is unparalleled. It’s therefore a great accelerator to use your singing voice as part of your interval Ear Training.
Even the simplest exercise, a variant of our Basic Drill, is still a very useful one:
EXERCISE: Sing Example Intervals
|
Naturally this is suitable for melodic intervals (unless you’ve mastered Tuvan throat singing and can sing multiple notes at once!) but you’ll find that really getting “inside” the intervals in this way helps unlock the harmonic recognition for you too.
The advantages of singing intervals can’t be overstated. You’re developing your voice, you’re leveraging that feedback loop, you’re feeling the sounds of the intervals literally deep inside yourself, you’re calibrating your inner Pitch Ruler both for recognition and production of note pitches, and you open up the use of Intervals instinctively as part of creative activities.
Another way to use Singing is comparable to the “Solfa Songs” exercise for Solfa:
EXERCISE: Sing Through Sets Of IntervalsVery simple:
|
A great starting point for that would be the pentascale: sing up from the tonic to each note in turn (on a neutral sound, like “ahh” or “doo”) and name the interval each time:

You can also sing the adjacent Intervals, which is a great way to get a feel for Minor 2nds and Major 2nds:

Finally, you can try navigating between notes by choice, to practice with all the interval types in the Pentascale. For example moving from C up to E, up to F, down to C, up to G, it would sound like this:

At first you’ll probably want to check yourself against an instrument, to make sure you’re singing the notes you intend to. As you get familiar with the sound of these “melodies” you won’t need to keep doing that, and can simply sing through them, starting from various tonic notes. You can also ditch the initial “doo”s, and just sing the interval names directly.
Simply singing through each of these sequences daily will go a long way to developing your interval skills, and it’s a perfect example of off-instrument practice you can do any time you have a moment or two to spare. If you get strange looks while standing at the bus stop singing intervals, just don’t blame me!
Applied Activities
With Integrated Ear Training, the goal is not to just do “ears” practice (Hearing) or even just “singing/instrument” practice (Hands), but to develop our instinct for pitch and rhythm through a combination of all four H’s (Head, Hands, Hearing and Heart) and in a way that’s always connected to real music. Another way to say it is that we want to move from “Practice” exercises more into “Apply” activities.
Instrumental Drills
The Basic Drill for intervals is typically done with recorded or app-generated examples, but can also be done by using your instrument to provide examples yourself. Naturally the “guessing” step won’t be necessary (unless you’re working with a friend) since you’ll already know the type of interval you’re playing. However, there is still great benefit in listening actively to a range of examples, comparing and contrasting, singing back, audiating in advance the second note, and so on.
Depending on your instrument this may be straight-forward. For example, the guitar fretboard and piano keyboard are organised into chromatic steps, and so you can directly find the required notes for a given interval type without needing to “spell” the intervals in letter names. For other instruments, you can either count up in chromatic steps, or use the resource mentioned earlier in the chapter for learning about spelling intervals if you’d like to more quickly know the second note to play. As mentioned above, it’s a good idea to start out with a fixed “root” note for a whole series of examples, which simplifies things too.
One benefit of doing these Instrumental Drills is that it will naturally lead to you wanting to explore more practical, exploratory and creative activities, like those we’ll cover next.
Playing By Ear
Here’s a simple exercise to begin playing melodies by ear with Intervals:
EXERCISE: Play By Ear, Using Intervals
|
As noted earlier in the chapter, most melodies move in stepwise motion (i.e. Minor and Major 2nds) most of the time, and when skips do feature they are often skipping a single note (i.e. moving in Minor or Major 3rds). This means you don’t need to have gone very far with your interval recognition skills to have some good success with this. Remember it’s fine to leave a blank or write a question mark if you’re not sure. Finding out the answer and singing it with the corresponding interval name will help develop your skills further.
That’s a simple example of how you can start exploring Playing By Ear using Intervals. We’ll cover this more fully in Chapter 14: Playing By Ear with the Play-By-Ear Process.
Transcribing
You can use the same process to practice transcribing music i.e. writing down the notes. Use whatever notation is familiar and comfortable for you, whether that’s simply writing down the letter names, using traditional staff notation, guitar tablature, or a Pitch Contour with your own system of annotations.
Musicians often think that transcribing is a very advanced skill, but as you can see, a simple step-by-step process combined with developing your Relative Pitch can quickly make it possible to write down any melody you hear. You’ll discover in the next chapter how the same can be true of harmony, through Ear Training for Chords and Progressions.
Writing Music
Even if you’ve never written music before, and you’re right at the beginning of your journey with Intervals, you can begin using them to write music and even to improvise.
Here’s a simple exercise. You might like to treat it as a “game”, as this removes some of the intimidation factor which composing and improvisation can otherwise bring! It will begin as writing a melody, and we can then extend it towards improvising a melody on-the-fly.
Remember our Pitch Ladder and staff diagrams of the intervals in the pentascale:
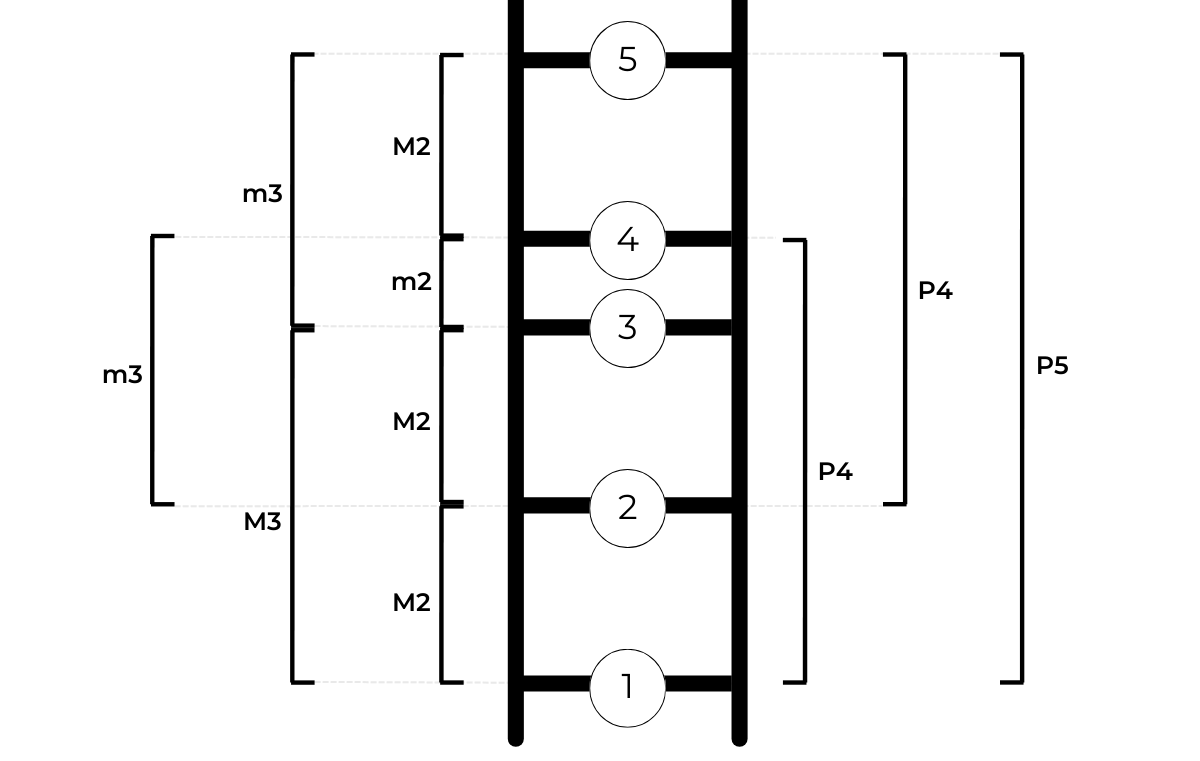
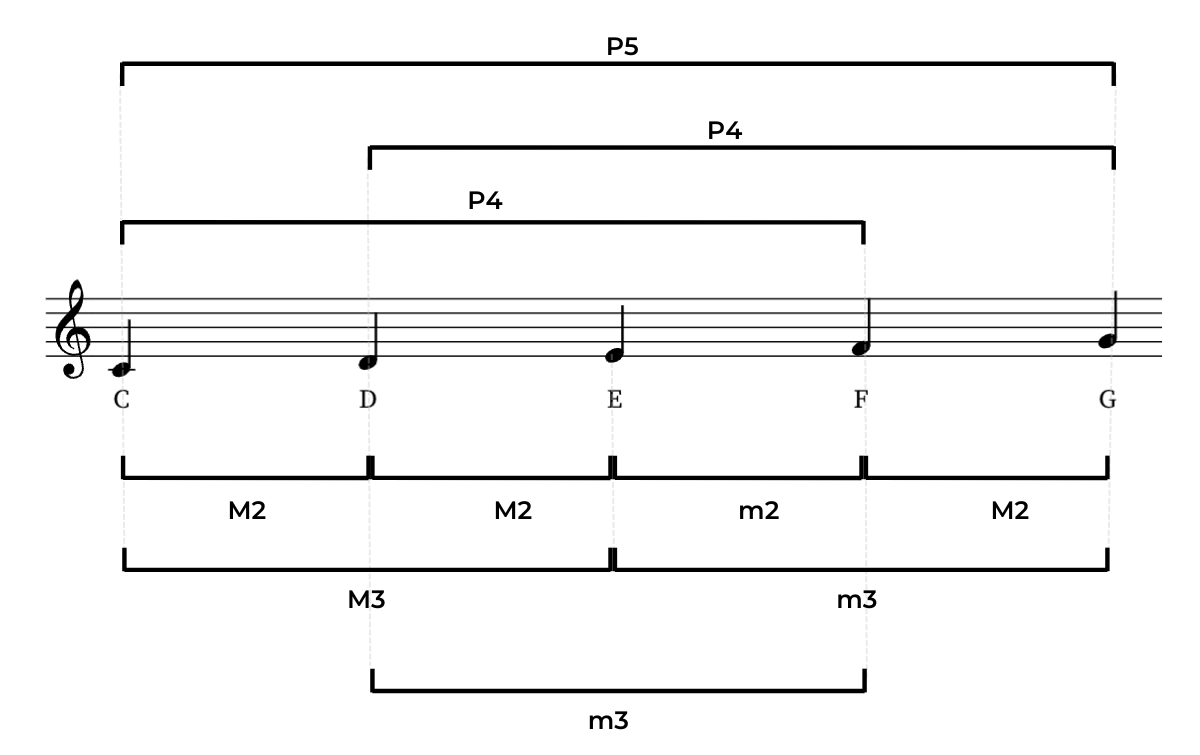
Have one of these two diagrams in front of you (whichever you prefer) as you try the following. Do it in a step-by-step way, taking your time.
EXERCISE: Write Music Using Intervals
You just composed a melody! Now let’s try another experiment…
How did your melodies sound this time? What happened to them when we lifted the constraint of the major pentascale? |
We’ll explore writing music more in Chapter 16: Songwriting.
Improvisation
Once you’ve spent some time playing around with writing melodies in this way, try Improvisation. You can follow the exact same process as the Writing Music exercise above, but do it on-the-fly, making your interval choices in the moment. You might be surprised how easy and fun improvisation is once you’ve first experimented with it in a no-pressure step-by-step way, and you use the same “constraints” as you’ve become familiar with through the writing exercise.
That’s a simple starting point for improvising with intervals, and a great way to start tuning yourself in to the stepwise and skip motion of melodies, as well as the interplay between interval types and scale degrees.
We’ll explore improvising and the idea of “constraints” more fully in Chapter 15: Improvisation with Expansive Creativity.