

Once you have a basic ability to match pitch, one note at a time, the next step is to practice moving between notes accurately. Once you put this second core skill in place you have everything you need to sing simple melodies easily and reliably, which is sufficient to get all the benefits of singing described at the beginning of this chapter.
Listening to Yourself
The most important part of improving vocal control is learning to listen to yourself as you sing, and to adjust your voice when you notice you could make a better sound. Listening to ourselves provides the feedback loop, where we can learn what we like, what we don’t like, and where to deploy the various aspects of vocal control we’ll cover in the rest of this section.

We touched on this already above: the source of many singing problems is that we have “turned off” our perception of our own voice. This happens easily when we’re singing along with a recording, at a concert, or with others. With that sea of sound surrounding us, it’s easy to lose track of our own voice. But it even happens when singing solo, when we focus so intensely on the sound we’re imagining that we lose track of what’s really coming out.
Once you simply shift your attention, this becomes easy to fix, and in time will even become second nature for you.
There are three ways we can listen to our own voices. When we make use of all three, we can form a more complete picture of our vocal sound, and therefore have more of an idea what to change in our vocal control to produce the sound we desire.
1. Internal
Normally, we hear our own voices mostly through bone conduction—the way the sound waves travel within our bodies. These waves are further dampened and modified by a very sophisticated system of muscles which keep us from blasting out our own ears and overwhelming other sounds around us.
2. External
Recording yourself and listening back will be a tremendous aid in developing vocal control. Recording picks up the sound of your voice as it travels through the air, so you will be able to hear yourself as others hear you.
There’s an important warning I need to give you though! Because you’re used to hearing your speaking and singing voice via bone conduction, when you first hear yourself on a recording, your voice is likely to sound downright weird to you! This makes it a very uncomfortable experience for most people at first.
However once you’re aware of this phenomenon it’s easier to be gentle with yourself, knowing that just because your voice sounds weird to you, that doesn’t mean that it sounds weird to other people.
The solution is simply to keep recording yourself and listening back. The more you become accustomed to hearing your recorded voice, the more you’ll be able to judge more objectively what you really need (and don’t need) to fix.
Singing in a resonant room (for example a tiled bathroom) can be a good halfway measure combining both internal and external hearing, as you can hear your own voice reflected back to you as you sing.
3. Audiation
We’ve already seen how helpful audiation can be for matching pitch, to “take aim” before we sing a note. Audiation can also be a very useful tool for vocal control, when coupled with “reality checks” from internal and external listening.
EXERCISE: Listen to Yourself SingSing a short, simple melody, such as a folk song or nursery rhyme you know from memory (e.g. “Mary Had a Little Lamb”, “Happy Birthday”, “Jingle Bells”) and pay close attention to the sound you’re hearing internally. Then audiate the same melody, miming as you do. Jot down any differences or other observations you have when comparing your sung and audiated versions. Now, record yourself singing the same melody. When you listen back, compare (as objectively as you can!) the recorded, audiated, and internally-heard versions. Jot down what you notice. |
We’re not trying to “fix” anything in this exercise. Just take a little time to sensitise yourself to these three ways of listening, their advantages and limitations, and how you can start combining them to have a clearer picture of your voice. As you continue to learn more vocal control exercises, you’ll have a much better idea of how to improve.
Free Up Your Voice
When people start learning to sing, a common problem is not knowing how to use their muscles to produce different notes. It can feel like your voice is “all over the place” and it’s natural to think that what you need is to restrict it to the right notes.
It’s slightly counter-intuitive, but if we want to move accurately from note to note, hitting each one right on target, it’s actually helpful to free up our voice and really get fluid across our vocal range.
The two exercises below will help you start to free up your voice across your range. Each should be practiced daily to begin with, and the benefit you get will be dramatically amplified if you record yourself and listen back as we covered above.
EXERCISE: Sighing Through Your RangeBreathe in, and then as you breathe out, do so with a vocalised sigh. You’ll notice this sounds like a pitch sweeping downwards like we practiced earlier in the chapter, but it will probably feel more natural. Take a good breath beforehand and try to make your sigh as vocalised as possible so it’s closer to actually singing. Repeat this, starting from different places in your range. |
By doing these sighs, you’re allowing your vocal anatomy to get used to working the muscles used to change pitch.
As you get comfortable moving through different parts of your range, you will probably find you open up your voice to singing more notes than before i.e. expanding your range. Then we have the opportunity to start being more intentional about where in our range we move our pitch when we sing.
The next exercise is similar to the previous one and to the “siren” part of the “Determining Your Vocal Range” exercise earlier in the chapter, but this time it’s more controlled and with a specific start and target end note in mind:
EXERCISE: Pitch SweepsPick a specific note from the range you can comfortably sing. Then try sliding down to the same note one octave lower. If this is too far for your range, choose a note a Perfect Fifth lower instead (count down 7 half steps). The slide should be really slow and exaggerated. The key to this exercise is to keep it slow and pay attention to how far you are moving down in pitch. You can also try this exercise starting on the low note and sliding upwards in pitch to the high note. |
To refine your sense of pitch further you can also use an instrument to play each Half Step up the scale so you get an idea of the notes you are passing as you sweep your pitch. Make sure you keep your sung slide smooth though!
Hone Your Sense of Pitch
Now we’ll start to refine our sense of pitch and precision of vocal control. These exercises are also useful to practice daily, including recording yourself and listening back.
The first exercise is similar to “Pitch Sweeps”, but turning our smooth slide into a series of steps.
EXERCISE: Sing Half Steps And Whole StepsSing through an octave in your range, but instead of a smooth sweep, this time adjust your pitch in steps. You can use either Half Steps (a.k.a. “semitones” or “minor seconds”) or Whole Steps (a.k.a. “tones” or “major seconds”). So if you’re covering a full octave that will mean singing 13 Half Steps or 7 Whole Steps. |
Half Steps will be easier for most people because you are only rising in very small amounts. Again you can use an instrument or a digital tuner to help you pitch each note at first. Singing Whole Steps across a whole octave is a lot harder and may sound quite strange at first, as scales using only Whole Steps are not very common in music.
| TIP: If you are familiar with scales you might like to know that the Half Steps option means singing a chromatic scale, while the Whole Steps option is singing a whole tone scale—not a major scale, which would involve mixing both Whole and Half Steps! Once you’ve practiced with Half and Whole Steps, then if you’re familiar with the pentatonic or major scales you might like to practice Vocal Control with those too. |
Practice singing Half Steps and Whole Steps, first along with the audio demonstration or an instrument, then without. If needed, shift up or down an octave, or find a starting pitch more suitable to your range, usually somewhere in the lower part of your “sweet spot”.
Sing Intervals and Solfa
Although Half Steps and Whole Steps are the smallest “building blocks” of pitch, songs will normally also include larger leaps in pitch, i.e. bigger intervals. As a singer, it is therefore important to practice controlling your voice as it transitions between pitches which are further apart.
We’ll give some basic information on Intervals and Solfa below, enough to let you practice with these exercises, before we cover them fully in Part II.
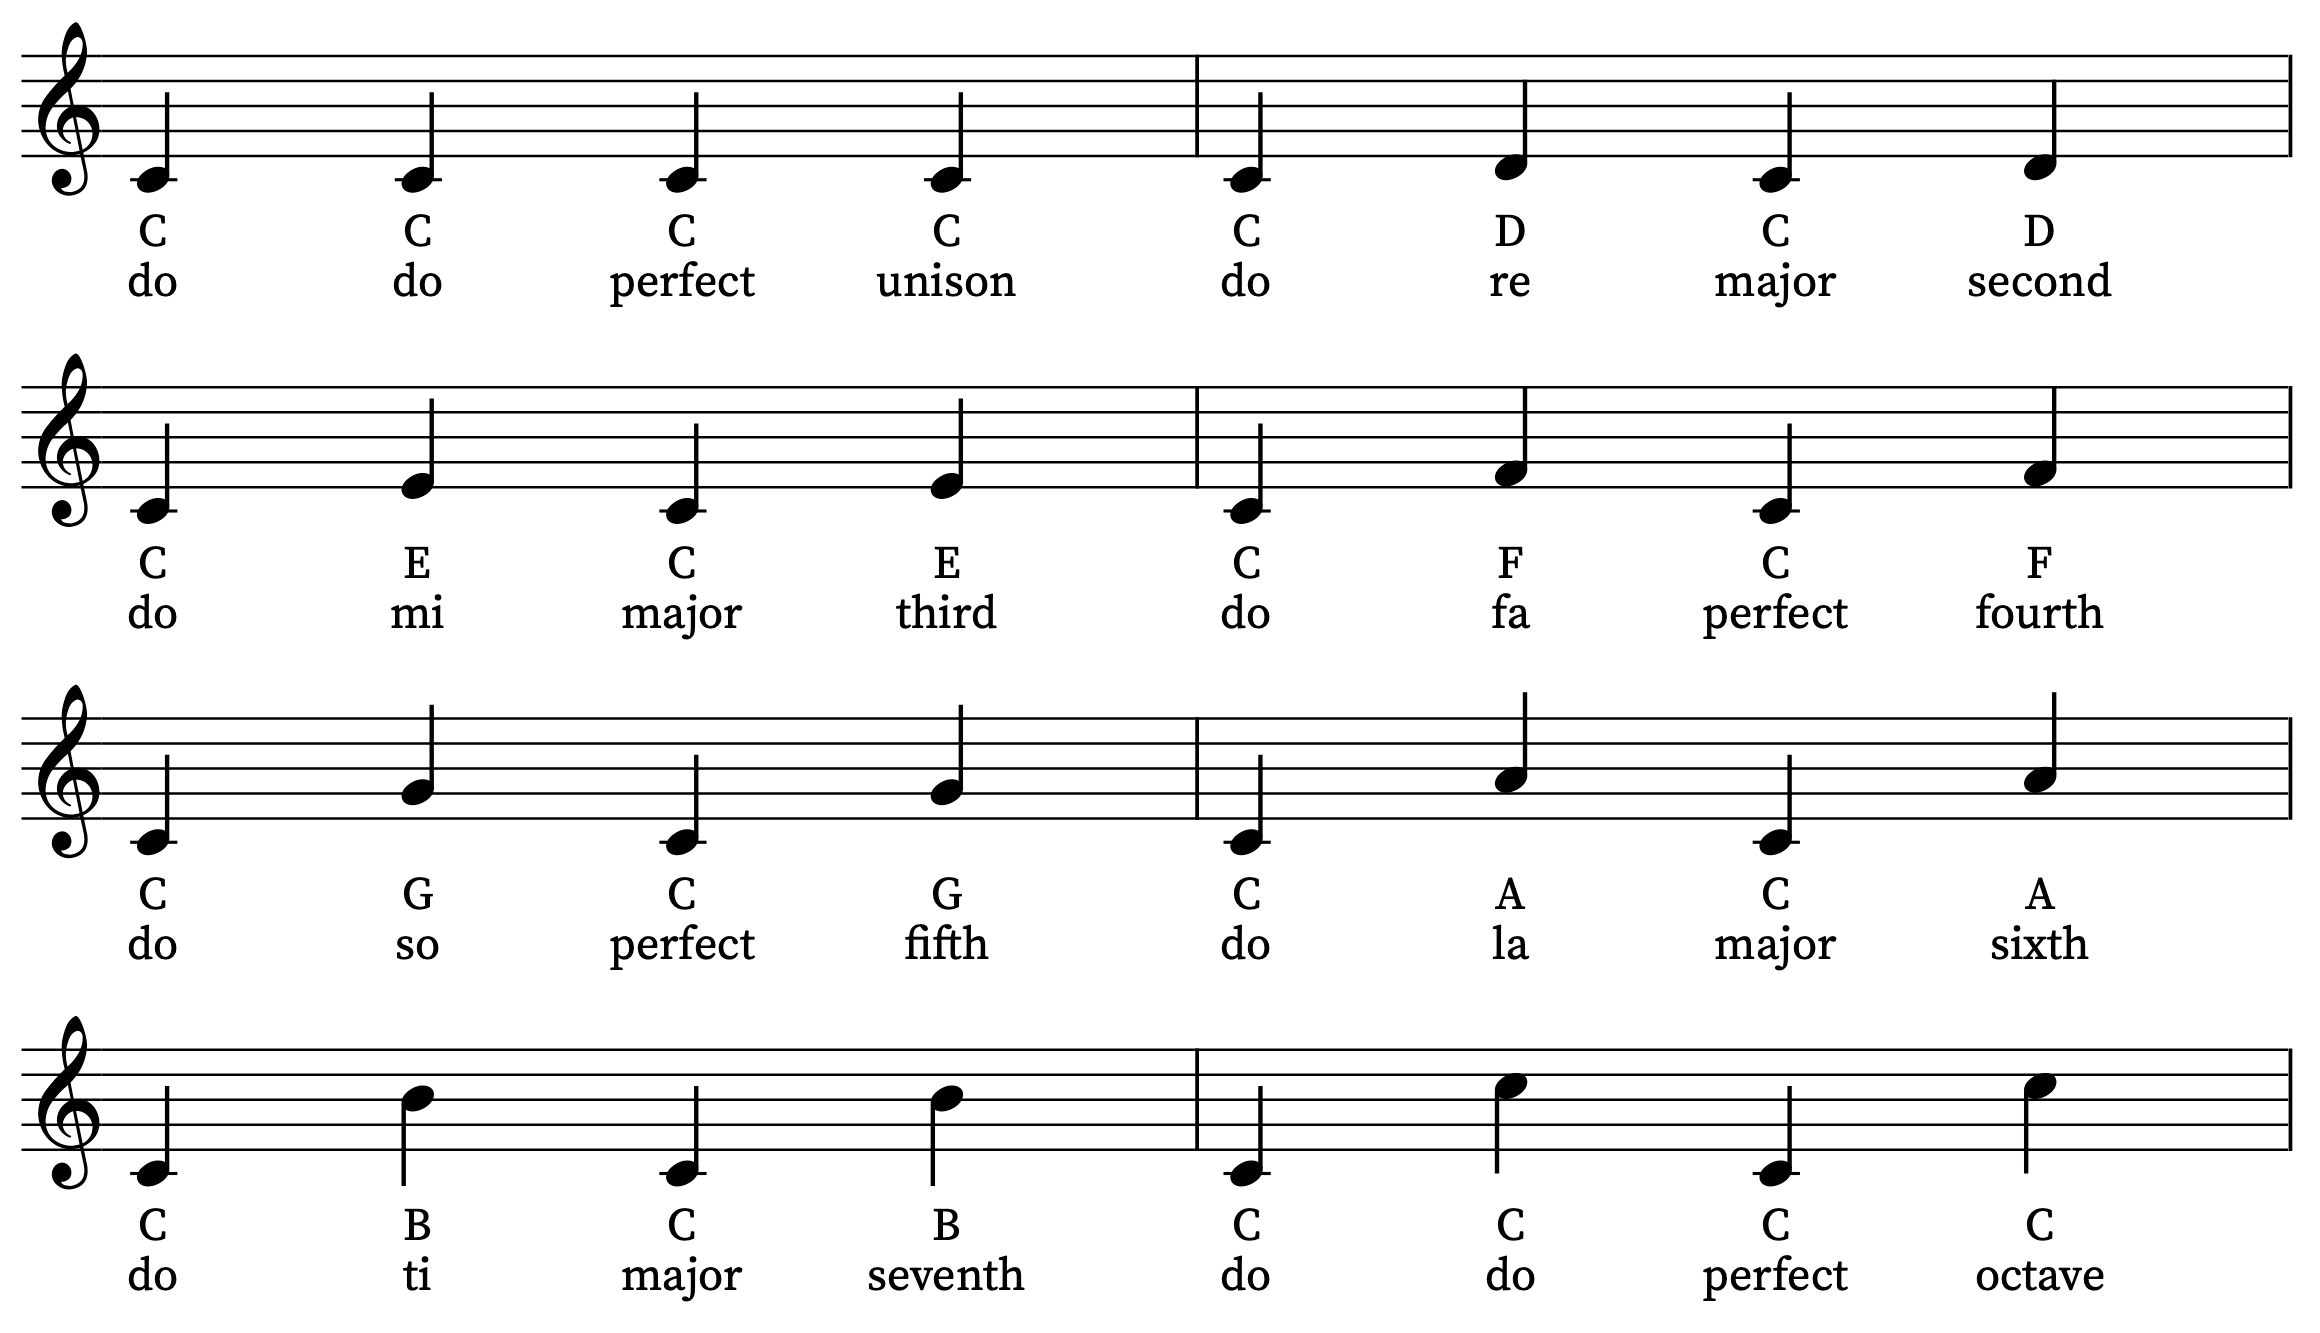
Solfa is a naming system for each note of the scale, and an interval is simply the distance between two pitches.
If we choose the note C as our tonic or “home note” (i.e. we’re in the key of C Major, and using the C Major scale) then the Solfa names, note names and Intervals are:
- do-re (C-D) = Major 2nd
- do-mi (C-E) = Major 3rd
- do-fa (C-F) = Perfect 4th
- do-so (C-G) = Perfect 5th
- do-la (C-A) = Major 6th
- do-ti (C-B) = Major 7th
- do-do (C-C) = Perfect Octave
One of the best ways to practice both Ear Training and vocal control is to sing pairs of notes with the Solfa syllables, and then name the corresponding Intervals:
EXERCISE: Singing Solfa IntervalsPractice singing these “solfa intervals”, first along with the audio from the Additional Resources or an instrument, then without. Again, if needed you can shift up or down an octave, or find a starting pitch more suitable to your range, usually somewhere in the lower part of your “sweet spot”. Apply all of the vocal control techniques we’ve covered so far. Keep careful awareness of breath support. Warm up your voice with sighs and sweeps. Audiate before each note to “set your aim”. Listen attentively, and record your practice so you can observe where there’s room for improvement. |
This is an especially useful exercise because while you’re improving your pitching accuracy you’ll also be internalising Intervals and Solfa recognition which can start to enable Playing By Ear and sight-singing from written notation. More on all this in Part II!